

I love Springtime. It’s my favorite season, closely followed by Fall. But unlike in the Fall, where things start getting cozy with that magical nip in the air, Springtime invokes a sense of hope. Spring means growth, birth, rejuvenation. The ground begins to thaw, the trees and flowers bloom once again. And with that bloom comes the return of some of the best fruit coming into season. Peaches are definitely at the top of the list, in my book.
Despite that, it seems like peaches have taken a serious back seat in recent years when it comes to baking. They’re still around, sure, but I’ve noticed them much more highly featured in regular cooking for a burst of sweetness in a savory dish. I almost never see peach turnovers, peach cobbler, or the star of today, peach pie. I hadn’t thought much about it until my father mentioned a craving for it, one that couldn’t be satisfied because he couldn’t find it locally.
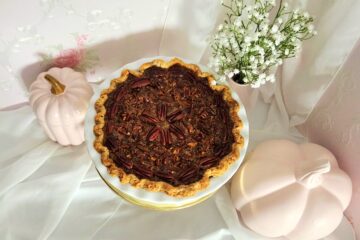
So, I made one, and it did not disappoint in the slightest. This peach pie has a crisp, flaky crust with a juicy, aromatic, intensely flavorful filling. Cinnamon and cardamom pair beautifully with the sweet, ripe, vibrant fruit. Bake this pie for your next picnic, potluck, or backyard barbecue. Help to bring back the popularity of the peach.
FAQs and Science
Why use frozen peaches?
There are a few reasons I opt for frozen over fresh peaches. For starters, they’re significantly cheaper than fresh peaches these days. They’re also more convenient, since they’re already sliced and peeled. Plus, there’s no question with ripeness, as frozen fruit gets flash frozen at peak ripeness. You’re welcome to use fresh if you’d like to, though!
Is there a benefit to using both cornstarch and flour as thickening agents?
There are benefits to each individually, but using both cornstarch and flour cancels out their shortcomings. Cornstarch has twice the thickening capacity as flour, but it breaks down more easily in acidic environments. Flour has a creamy consistency, but can have a pasty mouthfeel if it isn’t fully cooked. Put them together and you have a creamy, beautifully set filling that won’t get weepy and dampen the crust.
Are there any easy ways to crimp a pie crust?
I like to do a basic finger crimp! It’s easy, quick, and pretty, my favorite combo when I just need to get something done. Once you’ve reached step 7 in the Assembly section, space two fingers about an inch apart. Place them right up against the edge of the folded over dough, and place a finger from the other hand on the dough from the other side, so it’s sandwiched between. Gently push that singer into the center of the spaced out fingers to create an indent in the dough. Line one spaced out finger right up against the indent and gently press a finger into the crust again, creating a second indent. Repeat the process all the way around the rim of the pie.
Does it matter what kind of pie plate I use?
Yes, it does! Different materials conduct heat at different rates. Glass is a poor conductor of heat, so the bottom crust has difficulty fully baking. Dark metal attracts too much heat, so you run the risk of the pie burning. I only ever bake with ceramic or light metal pie plates, they’re solid conductors of heat that produce a fully baked, not at all burned pie!
What You’ll Need

- Standard pie dish (ceramic or light metal)
- 4-quart saucepan
- Small mixing bowl
- Small dish
- Dry measuring cups
- Measuring spoons
- Heat safe rubber spatula
- Whisk
- Fork
- Pastry brush
- Chef’s knife
- Cutting board
- Citrus press or reamer
- Rimmed baking sheet
- Rolling pin
- Pairing knife or scissors
- Pastry or pizza wheel
The Process
For the Filling
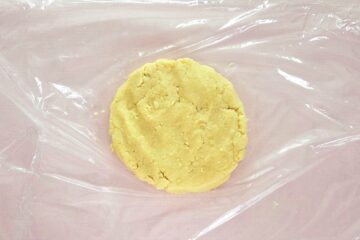
Before starting on this pie, make sure the dough for the crust is ready to go. I highly recommend preparing the double batch of my Easy Pie Crust, but you can use whichever pie crust you prefer, including store bought! Just make sure it’s the raw sheets of dough, in that case.
Now that your dough is accounted for, preheat the oven to 350F, on the convection setting if possible. Make sure the rack is positioned in the center of the oven. Using either butter or a nonstick baking spray, grease a standard 9-inch pie dish, made of either ceramic or light metal. Set it aside.
Whisk together the sugar, cornstarch, flour, cinnamon, salt, and cardamom in a small mixing bowl. The sugar granules help to break up any clumps of cornstarch or flour, so please don’t skip this step. Set the dry goods to the side.

Place a 4-quart saucepan over medium heat. Add the butter. When it’s melted, dump in the frozen sliced peaches. Toss them around using a heat-safe rubber spatula or large spoon to coat them in the butter, let them heat up.


Once the peaches have started to thaw and release their juices, pour the dry good mixture over them. Stir the peaches to distribute the dry goods. Keep stirring the filling occasionally, until it’s hot and thickened up. This should take approximately 15 minutes or so.


Immediately after it’s finished cooking, pour the filling onto a clean, rimmed baking sheet. Spread it out as much as you can, to speed up the cooling process. If necessary, place the pan into the fridge to cool it down faster. The filling has to be completely cooled before assembling the pie, or it will ruin the crust.


In a small dish, whisk the egg with a splash of water and pinch of salt with a fork. Break down the egg as much as you can. This is the egg wash, which is both a glue for the crust and helps brown the top to a beautiful golden color. Set the egg wash aside until it’s needed.

Assemble the Pie
When the filling has completely cooled, grab the first thing of pie dough from the fridge. If you’re just using a pre-made crust, skip ahead to placing it in the greased dish. If you’ve made your own dough though, dust a clean counter lightly with flour. Place the first half of dough on the floured counter and dust the top of the dough with more flour. Use the rolling pin to roll the dough out to a 13 inch circle, about 1/8th of an inch thick.

Line the greased pie dish with the rolled out dough. For ease of transfer, I like to fold the dough in half before moving it over, then unfold it inside the dish. Make sure to tuck it into the corner where the sides and bottom meet. Otherwise, you run the risk of the dough tearing as it bakes. Let any excess dough hang over the edge of the plate. If the kitchen is particularly warm, place the lined pie dish into the fridge to chill the dough once again.

Pour the cooled filling into the dough lined pie dish. Spread it out evenly, then return the dish to the fridge while you address the second half of the dough. In case it isn’t obvious, cold is your friend when baking a pie.


Sprinkle a clean counter with flour once again. Place the second thing of pie dough onto the flour, then dust it with more flour on top. Roll it out to an 11×12 inch rectangle, 1/8th of an inch thick. Yes, most recipes will tell you to roll this out to another circle, but since we’re making a lattice top, I find it easier to just make sure all of the strips are on the longer side.


Whether you’re using a pre-made dough or the one you prepared yourself, cut the second thing of rolled out dough into 1-inch strips. I like to use a ruler as a guide, since they’re approximately 1-inch thick. Line it up along the edge on one side, then use a pastry or pizza wheel to cut the strip of dough on the opposite side.


Remove the pie from the fridge and brush a thin layer of egg wash around the rim of the crust. Lay 4 strips of the dough you’ve just cut across the top, evenly spaced. Fold every other strip halfway back, and lay a new strip going in the opposite direction across the two still laying down. Allow any excess to hang over the edge of the plate for now.


Fold the two strips pulled back down again, then fold back the opposite two strips flush against the one laying on top of them. Lay down another strip of dough, and fold down the strips pulled back.

Flip the pie around and repeat this process using two more strips of dough. If the kitchen is warm and the dough has become floppy or greasy, cover the pie with plastic wrap and return it to the fridge for 30 minutes or so.


Trim off the excess dough around the rim of the pie, so that it goes just beyond the edge of the plate.

Fold the dough over itself by about ½ an inch or so. This will help seal the filling inside.

To further seal the filling, crimp this edge of pie dough. I like to use the finger crimping method, as explained in the FAQs and Science section, but there are other ways! A fork gently pressed along the edge is as basic as it gets. You could also take any excess dough, cut it into thin strips, braid them, then lay them around the pie. If you opt for this option, I’d recommend sculpting leaves or flowers to place where the braids meet to hide that break.


Brush a thin layer of egg wash over the top crust. If you’d like, you can sprinkle it with sanding sugar to give it a bit more sparkle and crunch. I like to use gold or pink, so it feels just that little bit fancier. Place the pie on the center rack of the hot oven for 65-70 minutes, flipping halfway through. The crust should be a beautiful golden brown, on top of a bubbly filling.


Let the pie cool. It needs to cool completely before you slice into it, or the filling will start to run, as you can see. That’s what I get for rushing to finish before picking my daughter up from school. Rest assured, as soon as it had cooled completely, the filling stayed put beautifully. Slice it into 12 pieces, or however many your desired amount is, then serve with ice cream and enjoy! Any leftover pie should be stored in an airtight container in the fridge, for no more than 3 days.


Peach Pie
Bake Time: 350F for 65-70 minutes
Servings: 12 slices
Total Time: 2 hours
Prep Time: 55 Minutes
Ingredients
- Double Easy Pie Crust
- 1 cup granulated sugar
- 3 Tablespoons cornstarch
- 3 Tablespoons all-purpose flour
- 1 ½ teaspoons ground cinnamon
- ¾ teaspoon salt
- ¼ teaspoon ground cardamom
- 3 Tablespoons unsalted butter
- 32 oz sliced frozen peaches
- Juice of 1 lemon
- 1 large egg
- Pinch salt
Directions:
For the Filling:
- Preheat the oven to 350F, on the convection setting if possible, placing the rack in the center of the oven. Grease a ceramic or light metal standard 9-inch pie dish with butter, or spray it with a nonstick baking spray, and set it aside.
- In a small mixing bowl, whisk together the sugar, cornstarch, flour, cinnamon, salt, and cardamom. Set the dry goods aside.
- In a 4-quart saucepan on medium heat, melt the butter. Once melted, add in the frozen peaches. Squeeze in the juice of one lemon and give the peaches a stir, using either a large spoon or heat safe spatula.
- Allow the peaches to warm up and start releasing their juices, then dump the dry goods onto them. Give them a toss and allow them to continue heating. Stir them occasionally until the peaches are hot and the filling has thickened up, a process that should take around 15 minutes.
- Once finished, immediately pour the filling onto a clean, rimmed baking sheet. Spread the filling out and set it aside to cool.
- In a small bowl, crack the egg and sprinkle a pinch of salt on top of it. Whisk it briskly with a fork, then set it aside. This is the egg wash.
Assembling the Pie
- Wait for the filling to completely cool before working with the pie crust. Dust a clean counter with flour. Remove one thing of dough from the fridge and place it onto the floured counter, sprinkling more flour on top.
- Roll the dough out to a 13-inch circle, with around 1/8th of an inch in thickness. Fold the circle in half and transfer the dough onto the greased pie plate. Unfold it and gently tuck the dough onto the bottom and up the sides of the dish, so it touches the corners. Allow any excess dough to hang over the sides of the plate.
- Pour the completely cooled filling into the dough-lined pie plate. Place it in the fridge to stay cold while you roll out the second half of dough.
- Sprinkle flour onto a clean counter again and place the second thing of dough on top of it. Dust a bit more on top and roll it out to an 11×12 inch rectangle. Cut the rectangle into 1-inch thick strips, using a pastry or pizza wheel.
- Remove the pie from the fridge and place 4 strips of dough on top vertically, spaced about an inch apart from each other. Pull back two of the strips halfway, then place another strip horizontally. Fold down the two strips that you had pulled back, then pull back the two opposite strips. Place another strip horizontally, then flip the pulled back strips of dough down. Turn the pie around and repeat these steps on the other half of the pie. Use reference photos above as a guide.
- Trim the excess down hanging over the edge until it goes just beyond the edge of the pie plate. Fold the dough over itself by about ½ an inch.
- Crimp the edge of the pie. See the FAQs and Science section for suggestions on how to do so easily. Brush the top of the crust with egg wash.
- Place the pie on the center rack of the hot oven. Bake the pie for 65-70 minutes, flipping it around halfway through baking, until the filling is bubbly and the crust is golden brown.
- Allow the pie to cool completely, then cut it into 12 equal slices, or the desired amount. Store any leftover pie in an airtight container in the fridge for up to 3 days. Serve a slice up with vanilla ice cream, and enjoy!
Tips
- The filling can be prepared and either stored in the fridge 2 days ahead of time or frozen for up to 3 months. Thaw it gently in the fridge overnight the day before you’re ready to bake the pie.
- Bake the pie on a rimmed baking sheet to catch any filling that boils over.

0 Comments